เรายินดีต้อนรับคุณติดต่อเราอย่างมั่นคงไม่เพียง แต่ซัพพลายเออร์ที่เชื่อถือได้ของคุณเท่านั้น แต่ยังรวมถึงพันธมิตรทางธุรกิจของคุณด้วย
 +(86) -133 8863 9264
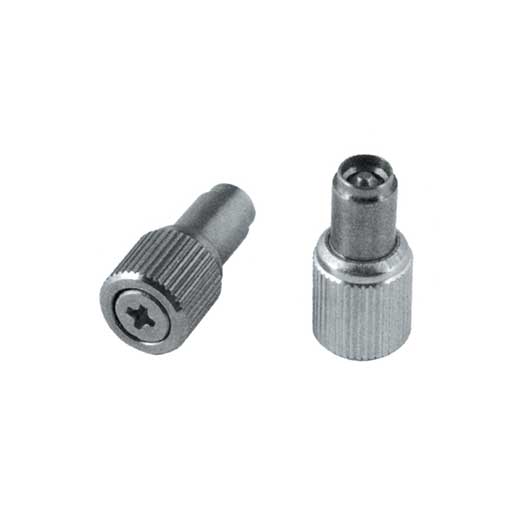
May 06,2026
Mar 25,2026
น็อตหมุดย้ำหรือที่เรียกว่า rivnuts, threaded inserts, blind threaded inserts หรือ nutserts – เป็นตัวยึดทรงกระบอกผนังบางที่มีเกลียวภายในซึ่งติดตั้งลงในรูที่เจาะไว้ล่วงหน้าจากด้านเดียวเท่านั้น โดยไม่มีการเข้าถึงด้านหลังของวัสดุ เมื่อติดตั้งแล้ว จะมีจุดเชื่อมต่อเกลียวถาวรที่แข็งแรงในวัสดุที่บางเกินกว่าจะยึดเกลียวที่มีประโยชน์ไว้ได้ด้วยตัวเอง วัสดุที่การต๊าปไม่สามารถให้แรงดึงดึงออกได้เพียงพอ หรือชุดประกอบที่ด้านหลังของแผงไม่สามารถเข้าถึงได้อย่างสมบูรณ์หลังการผลิต
หลักการติดตั้งนั้นตรงไปตรงมาแต่มีกลไกที่สวยงาม: น็อตหมุดจะถูกสอดเข้าไปในรูโดยที่ตัวเกลียวของมันยื่นออกมาทางด้านที่เข้าถึงได้ เครื่องมือติดตั้งจะเกี่ยวเกลียวภายในและดึงก้านในขณะที่จับหน้าแปลน ทำให้ส่วนด้านหลังที่ยังไม่ได้เกลียวของตัวเครื่องพังทลายลงและทำให้เสียรูปออกไปด้านนอกจนนูนที่ยึดวัสดุทั้งสองข้างไว้ระหว่างส่วนนูนและหน้าแปลน ผลลัพธ์ที่ได้คือตัวยึดแบบเกลียวที่ไม่หมุนซึ่งจะถูกยึดเข้ากับรูอย่างถาวร น็อตรีเวทที่ติดตั้งไว้สามารถรับโบลต์หรือสกรูมาตรฐานจากด้านที่เข้าถึงได้ ซึ่งจะทำให้น็อตอยู่ในตำแหน่งที่ไม่สามารถยึดน็อตไว้ได้อย่างมีประสิทธิภาพ
The engineering value of blind rivet nuts เห็นได้ชัดเจนที่สุดในการผลิตโลหะแผ่น ซึ่งแผงเหล็กและอลูมิเนียมบางจำเป็นต้องมีการเชื่อมต่อเกลียวที่ปลอดภัยสำหรับฝาครอบ ขายึด ที่จับ และการติดตั้งอุปกรณ์โดยไม่ต้องเชื่อมน็อต หรือใช้น็อตกรงที่ต้องเข้าถึงทั้งสองด้าน สิ่งเหล่านี้มีคุณค่าเท่าเทียมกันในแผงคอมโพสิต การอัดขึ้นรูปกลวง กรอบพลาสติก และโครงสร้างใดๆ ที่การรวมกันของการเข้าถึงด้านเดียวและการยึดเกลียวที่แข็งแกร่งอาจจำเป็นต้องมีการออกแบบใหม่ น็อตรีเวทตาบอดที่ติดตั้งอย่างดีในแผ่นเหล็ก 2 มม. สามารถให้แรงดึงดึงออกได้ 3,000–7,000 นิวตัน และต้านทานแรงบิดของแถบ 4–25 นิวตันเมตร ขึ้นอยู่กับขนาดเกลียวและวัสดุ — ประสิทธิภาพการทำงานแบบน็อตเชื่อมสามารถทำได้ แต่เกลียวเกลียวธรรมดาในแผ่นบางไม่สามารถเข้าใกล้ได้
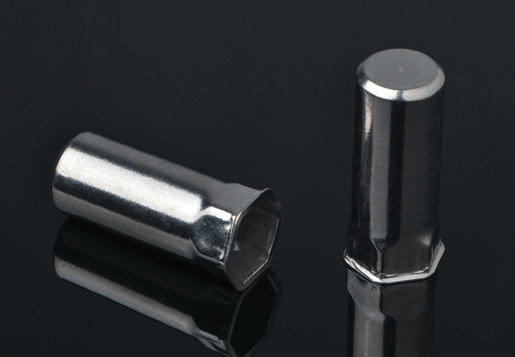
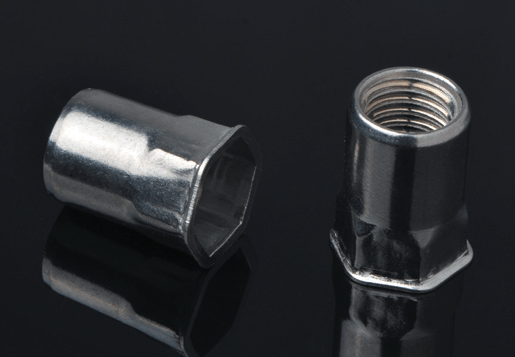
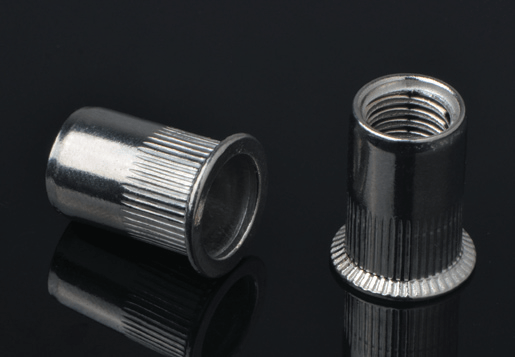
น็อตหมุดย้ำผลิตขึ้นในรูปทรงส่วนหัวและโปรไฟล์ตัวถังหลายแบบ ซึ่งส่งผลต่อการวางตำแหน่งตัวยึดที่ติดตั้งไว้โดยสัมพันธ์กับพื้นผิวแผง แรงบิดที่สามารถรับได้ก่อนหมุน และช่วงความหนาของแผงที่สามารถรองรับได้ การเลือกรูปแบบตัวเครื่องที่ถูกต้องมีความสำคัญพอๆ กับการเลือกวัสดุและขนาดเกลียวที่ถูกต้อง การใช้น็อตหัวแบนที่ต้องใช้หัวเทเปอร์ หรือรูปแบบตัวเครื่องเรียบที่ต้องใช้ตัวมีดเพื่อป้องกันการหมุน ทำให้เกิดการติดตั้งที่ไม่ตรงตามข้อกำหนดการออกแบบ ไม่ว่าจะตั้งค่าไว้แม่นยำแค่ไหนก็ตาม
หัวแบน (เรียกอีกอย่างว่าหน้าแปลนขนาดใหญ่หรือหน้าแปลนมาตรฐาน) เป็นรูปแบบหัวรีนัทที่พบมากที่สุด เส้นผ่านศูนย์กลางของหน้าแปลนมีขนาดใหญ่กว่าเส้นผ่านศูนย์กลางของรู ทำให้รู้สึกภาคภูมิใจกับพื้นผิวแผงและรองรับเพื่อกระจายภาระในการจับยึด น็อตหัวแบนถูกใช้โดยที่หัวยึดที่ติดตั้งไว้ไม่จำเป็นต้องจมอยู่กับพื้นผิว — ที่ด้านในของกรอบหุ้ม บนฉากยึดโครงสร้าง และในงานติดตั้งแบบซ่อนเร้น เส้นผ่านศูนย์กลางหน้าแปลนขนาดใหญ่ให้พื้นที่รับน้ำหนักที่ดีกับวัสดุแผง ซึ่งมีความสำคัญในวัสดุที่นิ่มกว่า เช่น แผ่นอะลูมิเนียมและพลาสติก ซึ่งหน้าแปลนขนาดเล็กอาจดึงผ่านรูภายใต้แรงโบลต์สูง
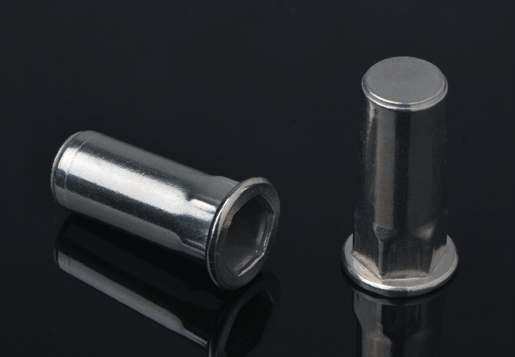
น็อตหมุดย้ำหัวเทเปอร์ซิงค์มีหน้าแปลนที่ทำมุมซึ่งออกแบบมาเพื่อให้อยู่ในระนาบเดียวกับหรือใต้พื้นผิวแผงเมื่อติดตั้งในรูเทเปอร์จม สิ่งนี้จะสร้างพื้นผิวเรียบสนิทหลังการติดตั้ง ซึ่งจำเป็นในพื้นผิวตามหลักอากาศพลศาสตร์ กลไกการเลื่อน แผงตกแต่ง และการประกอบใดๆ ที่หัวยึดที่ยื่นออกมาอาจไม่สามารถใช้งานได้หรือสวยงาม มุมคว้านรูเทเปอร์โดยทั่วไปคือ 90° หรือ 120° ซึ่งตรงกับรูปทรงดอกสว่านเคาเตอร์ซิงค์มาตรฐาน น็อตคว้านรูเทเปอร์ต้องมีการดำเนินการเคาเตอร์ซิงค์เพิ่มเติมบนรูก่อนการติดตั้ง โดยเพิ่มขั้นตอนกระบวนการ แต่ผลลัพธ์การติดตั้งแบบฝังมักจะเป็นเพียงวิธีแก้ปัญหาเดียวที่ยอมรับได้สำหรับข้อกำหนดการใช้งาน
น็อตหมุดย้ำหัวลดมีเส้นผ่านศูนย์กลางหน้าแปลนเล็กกว่าการออกแบบหัวแบนมาตรฐาน ช่วยให้สามารถติดตั้งได้ในตำแหน่งที่มีช่องว่างระหว่างรูและส่วนที่อยู่ติดกันจำกัด — ใกล้ขอบแผง ใกล้ตะเข็บเชื่อม หรือในช่องที่หน้าแปลนขนาดเต็มไม่พอดีทางกายภาพ พื้นที่แบริ่งที่ลดลงของหน้าแปลนที่เล็กลงหมายถึงความสามารถในการรับน้ำหนักในการดึงผ่านที่ลดลงในวัสดุเนื้ออ่อน ดังนั้นตัวแปรที่มีหัวลดลงจึงเหมาะที่สุดกับวัสดุที่แข็งกว่า เช่น แผ่นเหล็ก ซึ่งความเค้นของแบริ่งหน้าแปลนจะลดลงเมื่อเทียบกับความแข็งแรงของผลผลิตของวัสดุ การใช้งานบางประเภทยังใช้โครงด้านนอกที่เป็นลายหรือหกเหลี่ยมร่วมกับหัวที่ลดลงเพื่อป้องกันการหมุนภายใต้แรงบิด เพื่อชดเชยการยึดจับหน้าแปลนที่ลดลงของเส้นผ่านศูนย์กลางที่เล็กกว่า
น็อตหมุดย้ำถูกผลิตขึ้นในตระกูลวัสดุหลักสี่ตระกูล ซึ่งแต่ละตระกูลเหมาะกับการผสมวัสดุฐานที่แตกต่างกัน การสัมผัสกับสิ่งแวดล้อม และข้อกำหนดในการรับน้ำหนัก การเลือกใช้วัสดุรีนัทต้องคำนึงถึงไม่เพียงแต่สำหรับข้อกำหนดทางกลของข้อต่อเท่านั้น แต่ยังรวมถึงความเข้ากันได้ทางไฟฟ้ากับวัสดุหลักด้วย การติดตั้งรีนัทที่เป็นเหล็กในแผงอะลูมิเนียมในสภาพแวดล้อมทางทะเลจะสร้างเซลล์กัลวานิกที่จะทำลายอะลูมิเนียมที่อยู่โดยรอบภายในไม่กี่เดือน
| Material | Pull-Out Strength | ความต้านทานการกัดกร่อน | วัสดุผู้ปกครองที่เข้ากันได้ | แอปพลิเคชั่นที่ดีที่สุด |
|---|---|---|---|---|
| Steel (zinc plated) | สูงสุด | Moderate (indoor/dry) | เหล็ก เหล็ก พลาสติกแข็ง | ตู้อุตสาหกรรม เครื่องจักร ยานพาหนะ |
| อลูมิเนียม | Moderate | Good (outdoor) | อลูมิเนียม sheet, thin composites | แผงการบินและอวกาศ อุปกรณ์ทางทะเล ตัวถัง EV |
| Stainless Steel (A2/A4) | สูง | ยอดเยี่ยม | เหล็ก สแตนเลส อลูมิเนียม (พร้อมตัวแยก) | ทางทะเล การแปรรูปอาหาร อุปกรณ์กลางแจ้ง |
| Brass | ปานกลาง-สูง | Very Good | พลาสติก, PCBs, แผงที่ไม่ใช่เหล็ก | ตู้อิเล็กทรอนิกส์, อุปกรณ์ประปา |
น็อตหมุดเหล็กที่มีการชุบด้วยสังกะสีด้วยไฟฟ้าเป็นวิธีที่ใช้กันอย่างแพร่หลายมากที่สุด และมีค่าแรงดึงและแรงบิดสัมบูรณ์สูงสุด ทำให้เป็นตัวเลือกเริ่มต้นสำหรับการใช้งานแผ่นเหล็กโครงสร้างในสภาพแวดล้อมในร่มหรือในร่มที่แห้ง การชุบสังกะสีให้การป้องกันการกัดกร่อนในระดับปานกลาง ซึ่งเพียงพอสำหรับอุปกรณ์อุตสาหกรรมภายในอาคาร แต่ไม่เพียงพอสำหรับการสัมผัสกลางแจ้งหรือชายฝั่งเป็นเวลานาน สำหรับการใช้งานกลางแจ้งบนโครงสร้างเหล็ก น็อตหมุดสแตนเลส A2 (304) หรือ A4 (316) ให้ความต้านทานการกัดกร่อนที่จำเป็น — เกรด A4 ในสภาพแวดล้อมทางทะเลที่มีคลอไรด์หนัก โดยที่ A2 อาจมีความเสี่ยงต่อการกัดกร่อนของรอยแยกใต้หน้าแปลนที่ติดตั้ง
น็อตอะลูมิเนียมในวัสดุอะลูมิเนียมหลักเป็นตัวเลือกที่เหมาะอย่างยิ่งสำหรับงานไฟฟ้าสำหรับโครงสร้างและแผงอะลูมิเนียม ความแข็งแรงของผลผลิตที่ต่ำกว่าเมื่อเปรียบเทียบกับเหล็กหมายความว่าพวกมันจะมีความนูนที่นุ่มนวลกว่าในการติดตั้ง ซึ่งอาจเป็นประโยชน์กับวัสดุหลักที่บางหรือเปราะบาง ซึ่งแรงในการติดตั้งของน็อตหมุดเหล็กจะทำให้โซนของรูบิดเบี้ยว ไม่ควรใช้น็อตอะลูมิเนียมโดยที่สลักยึดจะเป็นตัวยึดเหล็กที่มีความแข็งแรงสูงซึ่งถูกขันด้วยค่าที่เกินแรงบิดของแถบเกลียวของเม็ดมีดอะลูมิเนียมที่นิ่มกว่า ในกรณีเช่นนี้ จำเป็นต้องใช้น็อตหมุดที่เป็นเหล็กหรือสเตนเลส โดยมีมาตรการแยกกระแสไฟฟ้าที่เหมาะสมสำหรับแผงอะลูมิเนียม
น็อตหมุดย้ำมีจำหน่ายในขนาดเกลียวเมตริกตั้งแต่ M3 ถึง M16 และขนาดเกลียวรวมตั้งแต่ 6-32 UNC ถึง 3/8-16 UNC ซึ่งครอบคลุมขนาดตัวยึดทุกขนาดที่ใช้ในโลหะแผ่นน้ำหนักเบาจนถึงการใช้งานโครงสร้างขนาดกลาง ช่วงของกริป — ช่วงความหนาของวัสดุหลักที่รีเวทนัทสามารถรองรับได้ — มีความสำคัญพอๆ กันกับขนาดเกลียว เนื่องจากน็อตรีเวทที่ติดตั้งในวัสดุที่อยู่นอกช่วงของกริปจะไม่สร้างส่วนนูนที่เหมาะสม (หนาเกินไป) หรือเปลี่ยนรูปมากเกินไปและแยกส่วน (บางเกินไป)
น็อตริเวตแต่ละรุ่นได้รับการออกแบบสำหรับช่วงการยึดจับเฉพาะ โดยทั่วไปจะครอบคลุมความหนาของวัสดุที่แตกต่างกัน 1.5–4 มม. ภายในหมายเลขชิ้นส่วนเดียว น็อตริเวตที่ระบุสำหรับช่วงด้ามจับ 0.5–3.0 มม. จะติดตั้งอย่างถูกต้องในแผ่นโลหะหรือแผงใดๆ ภายในช่วงความหนานั้น ทำให้เกิดส่วนนูนที่สอดคล้องกันซึ่งให้โหลดแคลมป์เต็มพิกัด การติดตั้งน็อตริฟที่มีช่วงกริป 0.5–3.0 มม. ลงในวัสดุขนาด 4 มม. ถือเป็นข้อผิดพลาดภาคสนามทั่วไปที่ทำให้เกิดการติดตั้งโดยที่ตัวเครื่องไม่ได้เสียรูปเพียงพอที่จะจับยึดด้านหลังของวัสดุ น็อตริฟจะหมุนหรือดึงออกมาภายใต้การรับน้ำหนักที่ต่ำมาก
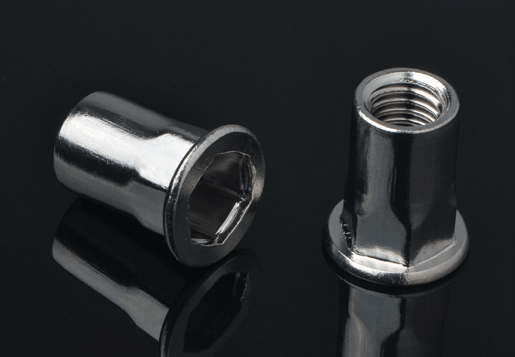
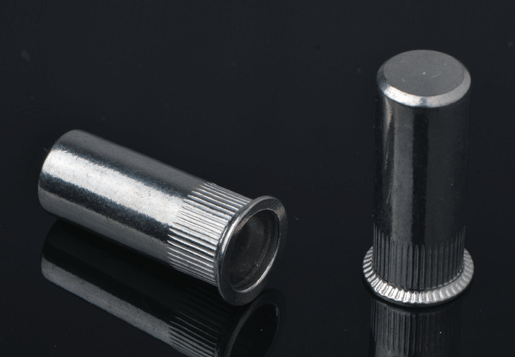
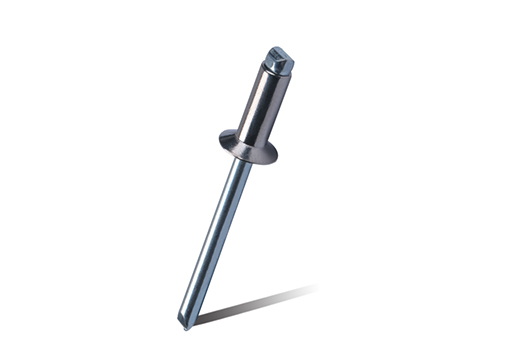
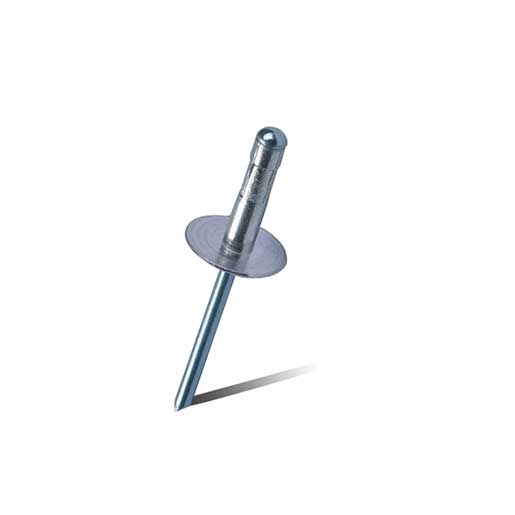
น็อตปลายเปิดแบบมาตรฐานมีตัวเกลียวทะลุซึ่งเปิดทั้งปลายหน้าแปลนและปลายที่ยื่นออกมา (ตาบอด) ซึ่งช่วยให้สลักเกลียวยาวเท่าใดก็ได้ทะลุผ่านเม็ดมีดที่ติดตั้งได้ แต่ยังหมายความว่าของเหลว ก๊าซ และสิ่งปนเปื้อนสามารถผ่านตัวน็อตหมุดย้ำได้ทั้งสองทิศทาง In applications requiring fluid or pressure sealing at the fastener location — pressurized enclosures, outdoor equipment, fluid-containing panels — closed-end rivnuts with a sealed blind end must be specified. Closed-end designs have the same external geometry and installation method as open-end designs but block the passage of fluid through the insert body, maintaining the integrity of any gasket or sealant at the joint interface without requiring additional sealing measures at the fastener hole.
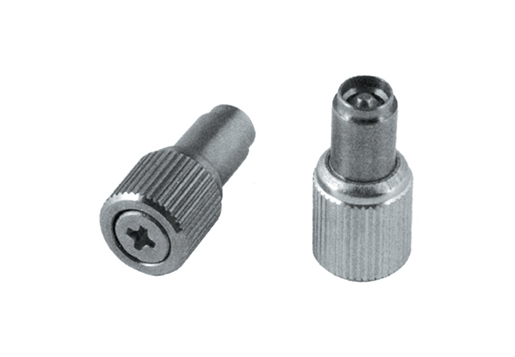
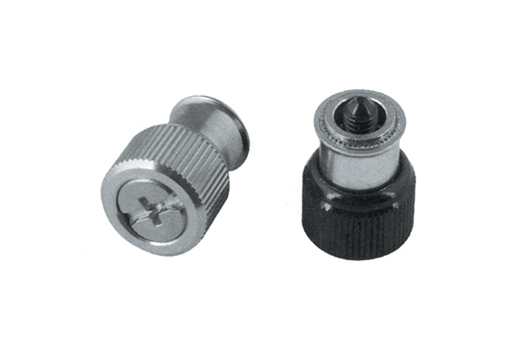
น็อตรีเวทตัวเรียบแบบมาตรฐานอาศัยแรงเสียดทานระหว่างส่วนนูนของตัวที่ผิดรูปกับวัสดุแผงเพื่อต้านทานการหมุนเมื่อขันโบลต์ผสมพันธุ์ถูกขันให้แน่นหรือถอดออก In soft materials — thin aluminum, plastics, and composite panels — this frictional resistance may be insufficient, causing the rivnut to spin in the hole rather than allowing the bolt to be tightened or removed. น็อตตัวกลมมีรอยหยักตามยาวหรือมีลวดลายเป็นนูนบนพื้นผิวด้านนอกซึ่งจะตัดเข้าไปในผนังรูระหว่างการติดตั้ง ให้กลไกป้องกันการหมุนเชิงบวกโดยไม่ขึ้นอยู่กับแรงเสียดทานในการหนีบ Knurled rivnuts are the correct specification for any application where the parent material is soft enough to allow spinning under moderate torque, or where the bolt will be frequently removed and reinstalled over the product's life.

Correct installation of blind rivet nuts requires a setting tool that can apply the precise combination of pull force and stroke required to form the bulge without over-setting or under-setting the body. การใช้เครื่องมือที่ไม่ถูกต้อง — หรือการใช้เครื่องมือที่ถูกต้องอย่างไม่ถูกต้อง — เป็นสาเหตุเดียวที่พบบ่อยที่สุดที่ทำให้การติดตั้งน็อตริฟนัทอ่อนแอหรือล้มเหลว การเลือกเครื่องมือขึ้นอยู่กับขนาดเกลียวที่จะติดตั้ง ปริมาณการผลิต และความสามารถในการเข้าถึงสถานที่ติดตั้ง
Manual rivnut setting tools use a two-handle scissor or lever mechanism to generate the pull force on the mandrel thread, forming the bulge through mechanical leverage. They are low cost, require no power source, and are suitable for occasional use or field repair work on small thread sizes — typically M3 to M8. The limitation of manual tools is operator fatigue and inconsistency in high-volume production, where the installation force varies between operators and over the course of a shift. For M10 and larger sizes, the pull force required exceeds what most operators can reliably generate with a manual tool, making pneumatic or battery-powered tools necessary.
เครื่องมือตั้งน็อตรีเวทแบบนิวแมติกใช้ลมอัดเพื่อขับเคลื่อนลูกสูบโดยใช้แรงดึงที่ต้องการบนแมนเดรลแบบเกลียว จากนั้นกลับด้านเพื่อปล่อยแมนเดรลและดีดชุดใบมีดออก โดยให้แรงในการติดตั้งที่สม่ำเสมอโดยไม่คำนึงถึงความล้าของผู้ปฏิบัติงานหรือการเปลี่ยนแปลง ทำให้เป็นตัวเลือกมาตรฐานสำหรับการใช้งานในสายการผลิตที่มีการติดตั้งน็อตริวหลายร้อยหรือหลายพันตัวต่อกะ เครื่องมือเกี่ยวกับลมมีจำหน่ายพร้อมการตั้งค่าแรงดึงและระยะชักที่ปรับได้ ซึ่งสามารถปรับเทียบตามขนาดและวัสดุของน็อตริฟนัทเฉพาะได้ เพื่อให้มั่นใจในคุณภาพการติดตั้งที่สม่ำเสมอตลอดการดำเนินการผลิตทั้งหมด เครื่องมือไฮดรอลิกใช้สำหรับขนาดที่ใหญ่ที่สุด (M12–M16) โดยที่แรงดันลมเพียงอย่างเดียวไม่เพียงพอที่จะสร้างภาระการตั้งค่าที่ต้องการที่ 15–25 kN
เครื่องมือติดตั้งน็อตริฟนัทที่ใช้พลังงานจากแบตเตอรี่มีส่วนแบ่งการตลาดเพิ่มขึ้นอย่างมาก เนื่องจากเทคโนโลยีแบตเตอรี่ลิเธียมไอออนทำให้เครื่องมือไร้สายมีประสิทธิภาพเพียงพอที่จะติดตั้งน็อตริฟนัท M8–M12 ด้วยแรงที่สม่ำเสมอและไม่ต้องพึ่งเครื่องมือลมในสายการบิน เครื่องมือไร้สายเหมาะอย่างยิ่งสำหรับงานติดตั้งนอกสถานที่ การปฏิบัติงานภาคสนาม และสภาพแวดล้อมการผลิตที่ไม่มีอากาศอัด หรือในกรณีที่มีความสำคัญในการเคลื่อนย้ายเครื่องมือ ผู้ผลิตชั้นนำซึ่งรวมถึง Stanley Engineered Fastening (แบรนด์ POP), Gesipa และ Böllhoff นำเสนอเครื่องมือตอกหมุดไร้สายพร้อมการตั้งค่าแรงบิดและระยะชักที่ปรับได้ผ่านส่วนต่อประสานของเครื่องมือ ช่วยให้การติดตั้งมีความสม่ำเสมอในการติดตั้งกับเครื่องมือนิวแมติกส์สำหรับขนาดที่อยู่ภายในช่วงกำลังการผลิต
น็อตหมุดย้ำที่ติดตั้งอย่างถูกต้องต้องมีการดำเนินการที่แม่นยำในแต่ละขั้นตอน — การเตรียมรู การตรวจสอบการเลือกน็อตหมุด การตั้งค่าการสอบเทียบเครื่องมือ และการตรวจสอบหลังการติดตั้ง ทางลัดในขั้นตอนใด ๆ ทำให้เกิดข้อต่อที่ล้มเหลวต่ำกว่าความสามารถในการรับน้ำหนักที่กำหนด และโหมดความล้มเหลว - การหมุนในรูหรือการดึงผ่านภายใต้ภาระ - มักจะไม่ปรากฏให้เห็นจนกว่าข้อต่อจะได้รับการทดสอบหรือล้มเหลวในการให้บริการ
น็อตหมุดย้ำปรากฏในอุตสาหกรรมและการใช้งานที่หลากหลายเป็นพิเศษ โดยรวมเป็นหนึ่งเดียวกันโดยข้อกำหนดทั่วไปสำหรับการเชื่อมต่อเกลียวที่แข็งแรงในตำแหน่งที่สามารถเข้าถึงวัสดุหลักได้เพียงด้านเดียว การทำความเข้าใจความต้องการเฉพาะของบริบทการใช้งานแต่ละอย่างช่วยในการเลือกตัวแปรรีนัทที่ถูกต้อง — วัสดุ ลักษณะส่วนหัว โปรไฟล์ของตัวเครื่อง และขนาดเกลียว — เพื่อประสิทธิภาพที่เชื่อถือได้ตลอดอายุการใช้งานของผลิตภัณฑ์
แผงตัวถังรถยนต์ กรอบประตู ส่วนรองรับแผงหน้าปัด แผงแบตเตอรี่ในยานพาหนะไฟฟ้า และตัวรถพ่วงใช้น็อตหมุดย้ำอย่างแพร่หลายเพื่อติดฉากยึด ชิ้นส่วนตกแต่ง ฮาร์ดแวร์จัดการสายเคเบิล และส่วนประกอบทางกลกับโลหะแผ่นบางที่ไม่สามารถเชื่อมได้หลังจากการทาสี หรือที่ต้องยอมรับและปล่อยส่วนประกอบต่างๆ ซ้ำๆ ตลอดอายุการใช้งานของยานพาหนะ น็อตหมุดเหล็กกล้าและสเตนเลสขนาด M5–M10 พบได้บ่อยที่สุดในการใช้งานตัวถังรถยนต์ โดยมีน็อตอะลูมิเนียมที่ใช้ในโครงสร้างยานยนต์ที่ใช้อะลูมิเนียมเข้มข้นเพื่อหลีกเลี่ยงปัญหาการกัดกร่อนของกัลวานิก ปริมาณการผลิตที่สูงในการผลิตยานยนต์เอื้อต่อเครื่องมือการตั้งค่าแบบนิวแมติกและหุ่นยนต์ที่ให้คุณภาพการติดตั้งที่สม่ำเสมอในอัตราหลายร้อยรูน็อตต่อชั่วโมง
ตู้ไฟฟ้า ชั้นวางเซิร์ฟเวอร์ แผงควบคุม และตัวเรือนอุปกรณ์อิเล็กทรอนิกส์ใช้น็อตหมุดย้ำเพื่อเป็นจุดยึดสำหรับราง DIN ขายึดถาดสายเคเบิล แผ่นยึดส่วนประกอบ และประตูแบบบานพับในแผงโครงเหล็กบางหรืออะลูมิเนียม ในการใช้งานเหล่านี้ น็อตริเวตมักทำหน้าที่เป็นตัวเปลี่ยนน็อตแบบยึด ซึ่งช่วยลดความจำเป็นในการแยกน็อตหลวมที่บริเวณด้านในของแผงตัวเครื่องที่ไม่สามารถเข้าถึงได้ หมุดย้ำทองเหลืองเป็นที่ต้องการในการใช้งานที่เกี่ยวข้องกับการติดตั้ง PCB หรืออุปกรณ์อิเล็กทรอนิกส์ที่มีความละเอียดอ่อน ซึ่งคุณสมบัติทางแม่เหล็กของเหล็กอาจรบกวนส่วนประกอบต่างๆ และในกรณีที่ทองเหลืองให้ทั้งความต้านทานการกัดกร่อนและคุณภาพเกลียวที่ดีเยี่ยมสำหรับสกรูระยะพิทช์ละเอียดทั่วไปในการประกอบอุปกรณ์อิเล็กทรอนิกส์
แผงภายในเครื่องบิน ช่องอุปกรณ์การบิน บูมหางเฮลิคอปเตอร์ และโครงเครื่องบินไร้คนขับ (UAV) ใช้น็อตหมุดย้ำที่ทำจากอลูมิเนียมและสแตนเลสเพื่อให้มีจุดยึดเกลียวในผิวหนังอะลูมิเนียมผนังบางและแผงคอมโพสิต ซึ่งการตอกย้ำไม่ให้เกลียวเข้ากัน และการเชื่อมนั้นทำไม่ได้ในทางปฏิบัติหรือในเชิงโครงสร้างที่ยอมรับไม่ได้ การใช้งานด้านการบินและอวกาศระบุหมุดย้ำตามข้อกำหนดของ NAS (National Aerospace Standard) หรือ NASM โดยมีข้อกำหนดด้านความคลาดเคลื่อนของขนาดและการทดสอบที่เข้มงวดมากกว่าผลิตภัณฑ์ในแค็ตตาล็อกเชิงพาณิชย์ หัวเทเปอร์แบบจมเป็นมาตรฐานในการใช้งานบนพื้นผิวตามหลักอากาศพลศาสตร์ เพื่อรักษาการไหลเวียนของอากาศที่ราบรื่นเหนือพื้นผิวแผง
โครงเฟอร์นิเจอร์ที่ทำจากท่อเหล็กและอะลูมิเนียม ชั้นวางจอแสดงผล ระบบแบ่งพาร์ติชัน และแผงหุ้มสถาปัตยกรรมใช้น็อตหมุดย้ำเพื่อยึดฮาร์ดแวร์ ขายึดเชื่อมต่อ ขาปรับระดับ และตัวเชื่อมต่อโครงสร้างไปยังส่วนที่กลวงหรือผนังบาง ซึ่งการร้อยเกลียววัสดุหลักจะไม่เพียงพอ และการเชื่อมไม่สามารถทำได้หลังจากการเคลือบสีฝุ่นหรืออโนไดซ์ ความสามารถในการติดตั้งน็อตหมุดหลังการปรับสภาพพื้นผิวเป็นข้อได้เปรียบในการผลิตที่สำคัญ — ชิ้นส่วนต่างๆ สามารถทำให้เสร็จก่อน จากนั้นจึงติดตั้งด้วยน็อตหมุดโดยไม่ทำลายพื้นผิว ต่างจากน็อตเชื่อมที่ต้องติดตั้งก่อนการตกแต่งและป้องกันในระหว่างกระบวนการเคลือบ
แม้ว่าจะมีข้อกำหนดของผลิตภัณฑ์ที่ถูกต้อง การติดตั้งน็อตหมุดย้ำจะล้มเหลวเมื่อตัวแปรกระบวนการไม่ได้รับการควบคุม ปัญหาต่อไปนี้เป็นสาเหตุของความล้มเหลวในภาคสนามและการปฏิเสธคุณภาพการผลิตเป็นส่วนใหญ่ โดยแต่ละปัญหามีสาเหตุที่แท้จริงและมาตรการป้องกันที่ชัดเจน
Copyright © Steady Industrial Fasteners Co. , Ltd. All Rights Reserved


 en
en 


")
")
")
